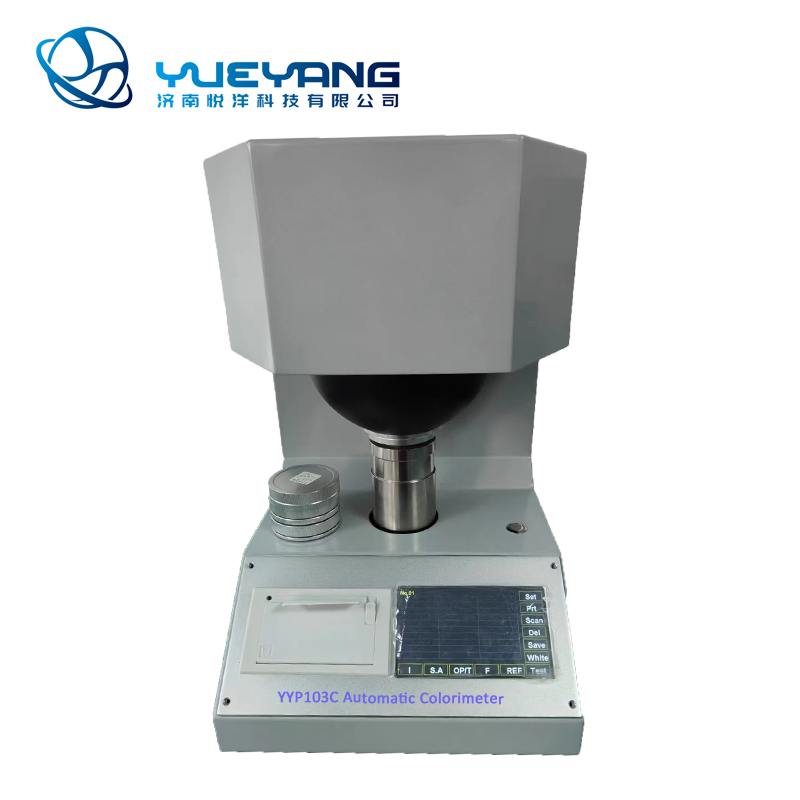
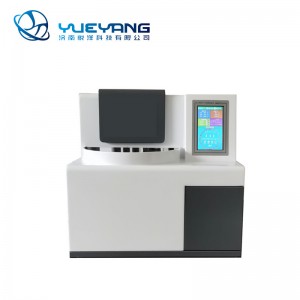
YYP103C Full Automatic Colorimeter
YYP103C Automatic chroma meter is a new instrument developed by our company in the industry's first fully automatic key determinationof all colors and brightness parameters, widely used in papermaking, printing, textile printing and dyeing,chemical industry, building materials, ceramic enamel, grain, salt and other industries, for the determination of the object's whiteness and yellowness, color and color difference, can also be measured paper opacity, transparency, light scattering coefficient, absorption coefficient and ink absorption value.
(1))5 inch TFT color LCD touch screen, the operation is more humanized, new users can be mastered in a short period of time using the method
(2) Simulation of D65 lighting lighting, using CIE1964 complementary color system and CIE1976 (L*a*b*) color space color difference formula.
(3)The motherboard brand new design, using the latest technology, CPU uses 32 bits ARM processor,improve the processing speed, the calculated data is more accurate and rapid electromechanical integration design, abandon cumbersome testing process of the artificial hand wheel is rotated, the real implementation of the test program, a determination of the accurate and efficient.
(4) Using d/o lighting and observation geometry, diffuse ball diameter 150mm, diameter of the testing hole is 25mm
(5) A light absorber, eliminate the effect of specular reflection
(6)Add printer and imported thermal printer, without the use of ink and color, no noise when working, fast printing speed
(7) Reference sample can be physical, but also for data,? Can store up to ten only memory reference information
(8) Has the memory function, even if the long-term shutdown loss of power, memory zeroing, calibration, standard sample and a
reference sample values of the useful information is not lost .
(9) Equipped with a standard RS232 interface, can communicate with computer software
(1)Determination of object color and color difference, report diffuse reflectance factor Rx, Ry, Rz, X10, Y10, Z10 tristimulus values,
(2)chromaticity coordinates X10, Y10, L*, a*, b* lightness, chroma, saturation, hue angle C*ab, h*ab, D main wavelength, excitation
(3)purity of Pe, chroma difference ΔE*ab, lightness difference Δ L*. chroma difference ΔC*ab, hue difference Δ H*ab, Hunter L, a, b
(4)CIE (1982) determination of whiteness (Gantz visual whiteness) W10 and partial Tw10 color value
(5)Determination of whiteness of ISO (R457 ray brightness) and Z whiteness (Rz)
(6)Determine the phosphor emission fluorescent whitening degree
(7) WJ Determination of whiteness of building materials and non-metallic mineral products
(8) Determination of whiteness Hunter WH
(9) Determination of yellow YI, opacity, light scattering coefficient S, OP optical absorption coefficient A, transparency, ink absorption value
(10)Measurement of optical density reflection? Dy, Dz (lead concentration)
Instrument accord withGB 7973, GB 7974, GB 7975, ISO 2470, GB 3979, ISO 2471, GB 10339, GB 12911, GB 2409 and other related provisions.
1 Purpose
1.1 Measure the color and chromatic aberration of object reflection
1.2 Measure the ISO brightness (blue whiteness R457) and the fluorescent whitening degree of fluorescent whitening materials
1.3 Measure CIE whiteness (Ganz whiteness W10 and color cast value TW10)
1.4 Measure ceramic whiteness
1.5 Measure the whiteness of building materials and non-metal minerals
1.6 Measure Hunter System Lab and Hunter (Lab) whiteness
1.7 Measure yellowness
1.8 Measure opacity, transparency, light scattering coefficient and light absorption coefficient of test sample
1.9 Measure absorption value of printing ink
2 Main technical characteristics
2.1 Simulate D65 illuminant for lighting. Adopt CIE 1964 chroma supplement system and CIE 1976(L*a*b*)color space chromatic aberration formula.
2.2 Adopt d/o lighting to observe the geometric conditions. The diameter of diffuse reflection ball is 150mm and of test hole is 25mm. There is light absorber to eliminate the influence of specular reflected light of test sample.
|
Parameter item |
Technique index |
| Power | AC(100~240)V,(50/60)Hz |
| Working environment | Temperature: (10~35)℃, Relative humidity < 85% |
| Sample size | Test plane≥φ30mm, Thickness≤40mm |
| Accuracy | Color coordinates≤0.001, Others 0.01 |
| Measurement value stability | 30min after preheating, within ±5°C , ≤ 0.1 |
| Repeatability error | Rx、Ry、Rz≤0.03, Color coordinates≤0.001,, R457≤0.03 |
| Printer | Built-in thermal printer |
| Communication Interface | RS232 |
| External dimension | 380(L*)260(W)*400(H)mm |
| Instrument net weight | 15kg |
3 Structure characteristics
3.1 Adopt high-pixel LCD and menu-type operation interface with detailed Chinese hints. It has easy operation and direct display.
3.2 Adopt high-speed thermosensitive minitype printer for data needing to be printed with slight noise.
3.3 The equipment adopts integrative mechanic structure design and is overall beautiful and firm .
The lower back of the equipment has socket (with fuse 1S inside) and power switch. The socket end connecting ground (connecting the equipment shell) should be reliably connected. The upper part is the mainbody of the equipment with measuring photoelectric parts inside. The underside of the diffuse reflection ball is measuring hole and its underside is equipped with test sample support and compactor. Put the test sample on the support and press it under the measuring hole. The upside of pulling board is equipped with UV block filter; turn the adjustment bolt beside the left pulling board to adjust the UV degree of lighting; when measuring fluorescent whitening degree, pull out the pulling board to eliminate the UV radiation of lighting. The operator turns the handwheel on the right side to shift between R457, Rx, Ry and Rz and decide the orientation by hand feeling. It displays successively R457、Rx、Ry和Rz on the lower right corner of LCD. The light source tungsten halide lamp is set inside the back lens hood. The filament height should be level to the center of condenser. It’s equipped with black canister and work standard board for equipment calibration.
Chart 4-1 Keyboard panel
3.4 See keyboard in Chart 4-1 and the functions are as follows:
|
Key |
Functions |
|
Zero |
Used to get zero, place black canister, Rx、Ry、Rz、R457 should get zero separately. |
|
Calibrate |
Used to calibrate, place standard board, Rx、Ry、Rz、R457 should calibrate separately. |
| Shift in menu mode and inputing data mode , delete data in testing mode. | |
| Switch of Menu selected or not, the increased key in inputing data, can browse previouse 8 times the measured value and the measured value can be used to delete. | |
| Confirmed in Menu, set multi-line data as a shift key. Measured chromaticity as calculated and browse button. | |
|
Set |
Setting number, search chroma measured data, set the reference sample, options settings, parameter settings, time settings. |
|
Ri I |
Measure after coated ink Ri, and display the ink absorption value. Note: According to its order: required to measure values R∝ of uncoated ink first. |
|
R∝ |
Measure values R∝ of uncoated ink, or values R∝ of non-transparent multi-layered sample. |
|
R0 OP.T |
Measurement of opacity, transparency, light scattering coefficient, light absorption coefficient of single-layer sample values (black canister ) and display the opacity, transparency, light scattering coefficient, light absorption coefficient (selected items). Note: Measurement of opacity, light scattering coefficient, light absorption coefficient must measure R∝ value first, measurement transparency R84 value must be measured first. |
|
R84 |
Measurement single-layer sample values (standard board 84 degree ): measurement transparency R84 value |
|
|
Print switch. Lower-left corner of the screen shows the state of its switch. |
|
D/F |
Measuring optical density Dy, Dz (lead-concentration), or measurement of fluorescence brightness F. |
|
RF |
Enter the number of reference samples as the basis for calculating chroma reference sample data, input reference sample can be measured under test conditions |
|
Test |
Test key |
|
Av |
Average os test value |
3.5 Equipment appearance figure
4 Symbols and formula of measurement terms
4.1 Color (Colour)
The diffuse reflection factors of red, green and blue colors: 、and
Stimulus values: 、、
Chromaticity coordinates: 、、
Brightness index:
Chroma index: 、
Chromaticity: ,
Hue angle: ,
Hunter Lab color space brightness:
Hunter Lab color space chroma: 、
Dominant wavelength: (Unit: nm), negative value is complementary color wavelength
Excitation purity:
Yellowness:
4.2 Chromatic aberration
Brightness aberration:
Chromaticity aberration:
Hue aberration:
Total chromatic aberration:
4.3 Blue whiteness (ISO whiteness): R457
Fluorescent whitening degree:
4.4 Ganz whiteness
CIE whiteness:
Color cast:
Applied to the conditions as follows:
Color cast value negative value indicates red cast and positive value indicates blue and green cast.
4.5 Ceramic whiteness
The whiteness calculated by the whiteness formula of green cast and yellow cast for daily ceramics according to GB/T 1503-92 is as follows:
(Green white when)
(Yellow white when or )
In the formulas: ;
4.6 The whiteness of building materials and non-metal minerals
4.7 Hunter whiteness
4.8 Opacity:
In the formulas: ——black back is lined with a piece of test paper, the diffuse reflection factor Ry measured value
——Ry measured value of multi-layer test sample (opaque)
4.9 Transparency:
In the formulas: R84——adopt Ry=84 white board as back lining, measured value of one-layer test sample
4.10 Light scattering coefficient S, light absorption coefficient A
,()
,()
In the formulas: g——test sample quantification ()
4.11 Paint ink absorption value:
In the formulas: R——test sample measured value before applying paint ink
R′——test sample measured value after applying paint ink(original test sample back lining)
c——paint ink coefficient
4.12 User-defined whiteness:
In the formulas: a and b can be set by the user and can either positive or negative
5 Equipment adjustments
The apparatus U = ; FA = .
Note: except to measuring fluorescence brightness F, plate pull out when necessary, all other operations must push the plate to the end (lower left-hand corner of LCD display ).
5.1 Getting zero
Turn the hand-wheel to R457 . Press zero key to display the following graph:
Place the black canister, then press . It will take about 3 seconds to finish getting zero. And then turn the hand-wheel to Rx, Ry, Rz, respectively, get zero according to the same operation.
5.2 calibration
Turn the hand-wheel to R457 . Press calibrate key to display the following graph:
Press key to input the value of No.1 standard board, then press key(if this data is the same with the standard board, then press key directly), this calibration takes about three seconds to finish. Then turn the hand-wheel to Rx, Ry, Rz, respectively, do the calibration with the same operation.
5.3 No. settings (and specify the chromatism of the reference sample)
By pressing “set” key to display the main menu as follows:
Press “set” key, then key, display as followings:
Number (No) the first and reference sample (rf) No. linkage, the last two digital are arbitrary numbers, the latter two such as 00, then it will not show its Number in the testing, otherwise show its Number. Thus the effective number is X01 ~ X99.
For example, numbered 202, then the number corresponding to test chromatism samples for reference ref.2.
5.4 Browse
To browse the data for numbered sample
Press “set” key, then press several times of key to Select the menu of Browse, then press key, display as followings:
Enter the last two digital of numbers have been measured, press key, can be obtained from the number of chrominance data.
5.5 Reference sample setting
To test chromatism , you must have a reference sample. The apparatus can enter 10 groups of the reference sample, have two ways to input, a data input, the other is the measurement of input samples.
5.5.1 Data input as followings:
Press “set” key, then press several times of key to Select the menu of Reference sample, then press key, display as followings:
Press key to input data, shift, RF key to calculate and “set”key to exit.
5.5.2 Input samples as followings:
Under test conditions, press RF key, as follows:
Turn the hand-wheel to test Rx、Ry、Rz separately, i.e. the inputed sample value, also can test several times and get average value.
5.6 Chroma option
Press “set” key, and press several times of key to Select the menu of chroma option, then press key, display as followings:
Corresponding option shows "Y" express selected, "N" indicates that no election, "Y" express priority.
YI: yellowness, W10 Ganz whiteness (CIE),
Ws User-defined whiteness, WJ Building Materials whiteness, WH Hunter whiteness.
5.7 OP.T.S.A option
Press “set” key, and several times of key to Select the menu of OP.T.S.A option, then press key, display as followings:
Corresponding option shows "Y" express selected, "N" indicates that no election
5.8 Parameter setting (U, FA, g, c)
5.8.1 Adjusting lighting UV radiance degree
If measure the R457 whiteness of fluorescent whitening test sample, put on No. 3 working board, turn handwheel to the position R457, push the pulling board, Then press test key (measuring key). The displayed number should be close the R457 standard value of No. 3 board (the difference should not be more than 0.3). If the displayed number is lower than standard value, turn clockwise the adjusting bolt near pulling board with small slotted screwdriver (otherwise, if more than standard value, turn the adjusting bolt counterclockwise) and push the pulling board till the end, pulling board after adjusting screw may not have in the end, then press test key. The above 6.1 , 6.2 should be repeated many times till the displayed number is equal to the R457 standard value of No. 3 board and take No. 3 board off.
5.8.2 Set the fluorescent factor U value
If need to measure the fluorescent whitening degree of fluorescent whitening test sample, the fluorescent factor U value should be pre-set.
Turn the handwheel to R457 position. Push the pulling board, calibrate and adjust lighting UV degree as 6.8.1, put No.3 working standard board on test sample support (marked with whiteness R457 and the fluorescent whitening degree F value). Press M key. The measured value should be equal toR457 standard value; then pull out the pulling board and press test key, It indicates value. , the fluorescent whiteness modification number u has been set before leaving factory.
Press “set” key, and several times of key to Select the menu of menu, then press key, display as followings:
Press key to input data, presskey to shift, “set” key to exit. U: fluorescence factor, FA: fluorescent whiteness of the correct value. g: quantitative units g/m2, c: coefficient ink.
5.9 User-defined whiteness
The apparatus also provides a User-defined whiteness formulas, user-friendly in the use of some special occasions.
Press “set” key, and several times of key to Select the menu of User-defined whiteness, then press key, display as followings:
Press key to input data, key to shift, and “set” key to exit.
5.10 Time setting
Press “set” key, and several times of key to Select the menu of time, then press key, display as followings:
Press key to input data, and “set” key to exit.
6 Measurement
6.1 ISO brightness (blue whiteness) measurement
Adjust lighting UV radiation according to 6.8.1 (generally it won’t change after one time of adjustment unless changing bulb)
Push the pulling board. Turn the handwheel to R457 light path, put on test sample and press test key to measure to get ISO brightness.
To get average value, then first press average key(the function is to remove the measure times, the next measurement started from the first, if not press the average key, as already measured data into the average users want to lead rather than the average ), after repeated measurements (up to 8 times), according to pressing the average key can take the average.
Users may press key to browse the measured data brfore make the average as the following:
6.2 Measure fluorescent whitening degree
Adjust lighting UV radiation according to 6.8.1. Set fluorescent factor U according to 6.8.2. Turn the handwheel to R457 light path and put on test sample. Press test key to get R457 value, Then pull out the pulling-plate and then press D/F key to get fluorescent whitening F.
6.3 Chroma measurement (For a Chroma test to be done must first number, and designated reference sample.)
Turn the hand-wheel to the Rx, Ry, Rz and do each measurement time (or repeatedly make the average), press key to browse chroma data (data selected by Chroma option).
6.4 Measure the opacity(OP be selected in OP.T.S.A option)
Turn hand-wheel to Ry, first, place multi-layer paper, then press Rα key (or multiple check average), and then single-contrast black canister, press R0 key (or multiple check average), that is measured by OP.
6.5 Light scattering coefficient and light absorption coefficient measurement(SA be selected in OP.T.S.A option)
Turn hand-wheel to Ry,first,place multi-layer paper , then press Rα key (or multiple check average), and then single-contrast black canister, press R0 key (or multiple check average), that is measured by SA.
6.6 Transparency measurement (T be selected in OP.T.S.A option)
Turn hand-wheel to Ry,first, place single-contrast 84 standard board, then press R84 key (or multiple check average), and then single-contrast black canister, press R0 key (or multiple check average), that is measured by T.
6.7 Paint ink absorption value measurement
Place non-coated paper without ink, and press Rα key (or multiple check average), and then coated paper after the ink, and press Ri key (or multiple check average), that is, ink absorption value “I”.
6.8 Light density measurement
Place the specimen, and turn the hand-wheel to Ry, press D / F key to get Dy value. turn the hand-wheel to Rz, press D / F key to get Dz value.(lead-concentration).
7 Etalon and the measured values
Etalon has two types of transmission standard and working standard according to different purposes. Generally, etalon nominal diffuse reflection factors RX、RY、RZ and R457 measured values (%). If three stimulation values X10、Y10、Z10 are calibrated, it can calculate RX、RY、RZ values by the following formulas.
RX=1.301355X10-0.217961Z10
Y10=RY
RZ=0.931263Z10
Fluorescent whitening etalon should mark diffuse reflection factor R457 and fluorescent whitening degree F measured value in order to adjust lighting UV radiation and calculate fluorescent factor u value according to 6.3 and 6.4.
7.1 Transfer standard
Transfer standard is for transferring measured value to working standard. Transfer stand should has even and smooth diffuse reflection work surface. The common transfer standard materials are including barium sulphate or magnesium powder, white ceramics, fluorescent whitening plastics or non-fluorescent white plastics, fluorescent whitening paper or non-fluorescent white paper etc. Generally, the closer transfer standard characteristics are to tested sample, the lower the error of this test sample measure is. Therefore, the user should try to choose the materials that are the same or close to the tested sample and submit regularly the nominal measured values to the superior measuring department according to measuring system requirements.
7.2 Work standard
Work standard is used when adjusting equipment in daily work. The equipment provides three white boards as work standard in which No. 1 and No. 2 are non-fluorescent standard board and No. 3 is fluorescent whitening standard board. No. 1 work board is used for daily calibration. No. 2 is calibration board and should be carefully preserved. And use No. 1 board to measure values if necessary. The calibration method is: like 6.1 calibration, but use No. 2 board to calibrate equipment; then measure No. 1 board RX、RY、RZ and R457 values as the nominal values that is to re-calibrate No. 1 board values. No. 3 board is used to calibrate lighting UV radiation of equipment as 6.3.1.
7.3 Measured values transfer
There are two transfer standards: non-fluorescent transfer standards mark RX、RY、RZ and R457 values. The fluorescent whitening transfer standards mark diffuse reflection factor R457 and fluorescent whitening F value
Adopt non-fluorescent transfer standard, and use fluorescent whitening transfer standard by the reference of 6.1 calibration equipment. Adjust lighting UV radiation referring to 6.3.1. Set fluorescent factor u value as 6.3.2. Finally measure work standard board, No. l and 2 board RX、RY、RZ和R457 values and No. 3 board R457 and fluorescent calibration equipment and adjust lighting UV radiation
8 Operation fault and equipment malfunction
8.1 Operation fault
The equipment operation faults mostly have display clue and sound clue (sound clue is longer than key-pressing sound)
Especially when the black canister is put by mistake on test sample in calibration to lead to that any test sample is 0, the user would think it’s equipment fault. And actually it’ll be solved if users re-calibrate correctly.
8.2 Equipment malfunction
After the equipment starts and self-tests, please open the back board of equipment if it indicates abnormal mistake signal
- If handwheel is in position
- Check if bulb is lighting. If not, please replace it and make sure bulb core is level to lens center
- Check if bulb turns black or white. If it’s abnormal, please replace bulb.
- If bulb is normal, please check the position that if bulb core is level to lens center. If the position is wrong, please adjust position.
- Turn off power supply and pull out plug; open upper board and back board and re-plug in all the sockets and then cover the cover board for electricity availability test.
- Press set key to enter adjust menu. Input password 123456 to enter automatic adjust signal menu. Press ↙key to automatically adjust signal and then re-calibrate equipment.
- If optic glass goes moldy, open upper board to check optic glass on rotation plate. Press M key to observe the light penetrability when light is on. If basically not penetrable, it needs to replace glass
8.2.2 If the keys have no reaction after turning on machine, please check if fuse inside power socket is damaged. If it is, please replace fuse 1A/250V
9 Maintenance
Equipment must have power supply 220V±10% 50Hz, and if voltage is not conforming to requirements, please use AC transformer. Turn off power supply after finishing equipment and cover the protection cover to keep clean.
Use clean gauze to clean test hole and test sample support after measure powder test sample to avoid adding powder and getting pollution for continuous test.
Don’t touch standard board surface by hand. Use absorbent cotton to clean standard board with alcohol to clean dirt. After using black canister, put hole down to avoid dust. The etalon should be placed inside accessory box to keep clean
Don’t touch optic parts by hand. Use nippers to nip absorbent cotton with alcohol to clean.
Don’t do power supply maintenance work to eliminate electric malfunction with electricity on
